
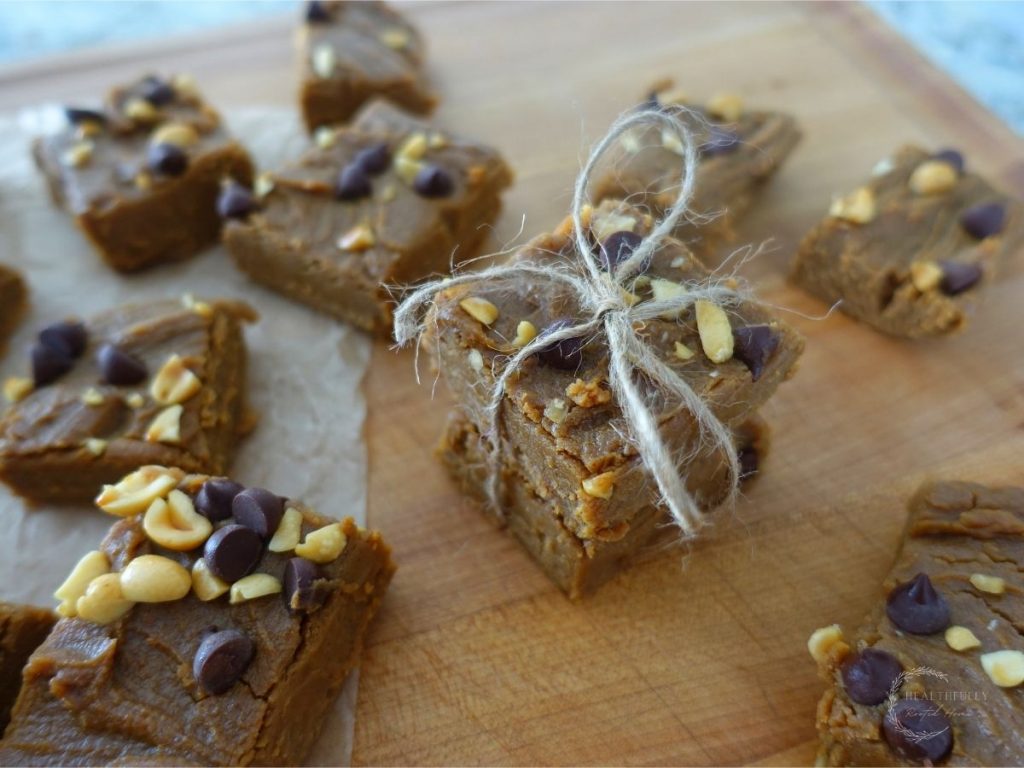
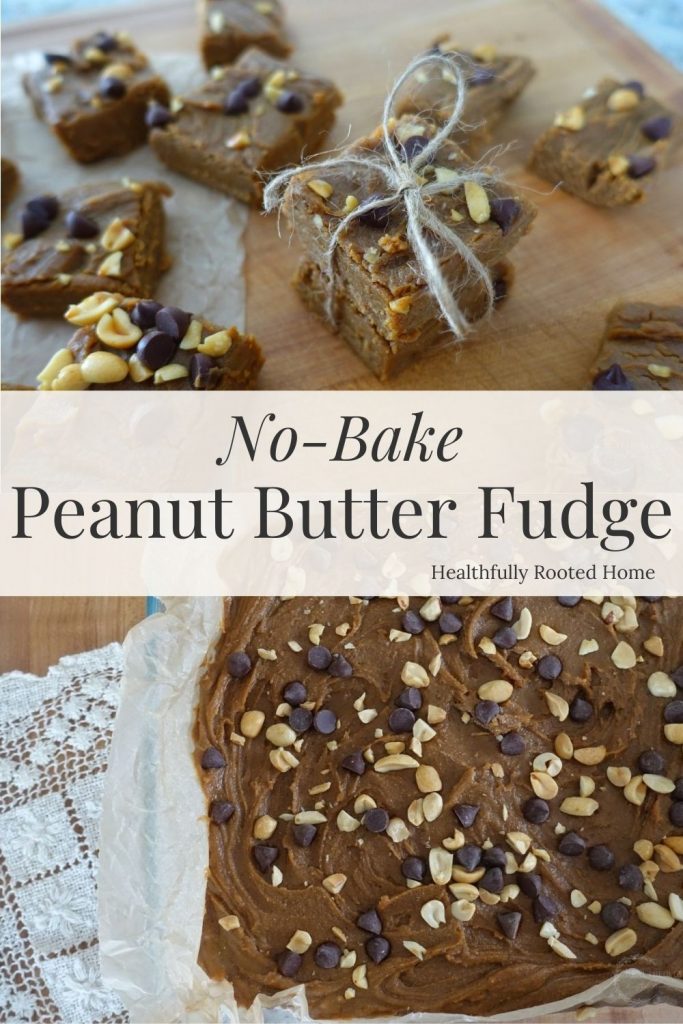
No Bake Peanut Butter Fudge
This no-bake peanut butter fudge recipe is a healthier and completely from scratch version made with homemade sweetened condensed milk. This easy fudge recipe makes for the perfect holiday treat!
This peanut butter fudge is so rich, creamy, and decadent – exactly what you want out of fudge, without all the added sugar!
Related: Maple Chocolate Chip Cookies
This post contains affiliate links, which means I make a small commission at no extra cost to you. See my full disclosure here.
If you’re looking for more Christmas treats, I have tons of sweet treat recipes that I’ve shared – some with a healthier spin, and some that are meant to be a true treat.
Holidays, parties, whatever the occasion, my chocolate-covered graham crackers are a total hit! But, my famous maple chocolate chip cookies are an all-time favorite.
how to make no bake peanut butter fudge

Using just 3 ingredients you can make yourself a healthier, from scratch peanut butter fudge that you don’t even have to bake!
You’ll love the rich and creamy texture with a caramel-like flavor from the homemade sweetened condensed milk!
Sweetened condensed milk peanut butter fudge Ingredients
Healthier sweetened condensed milk
- Organic whole milk – You could also use full-fat coconut milk for this recipe. I like to use organic, whole, grass-fed raw milk.
- Coconut sugar – Coconut sugar is healthier than cane sugar and has a lower glycemic index, but it’s still sugar, so that’s why this is a “healthier” not “healthy” sweetened condensed milk recipe.
Peanut butter fudge
- Healthier sweetened condensed milk – This is what you made above. You could also use storebought sweetened condensed milk in a pinch. Be sure not to buy evaporated milk.
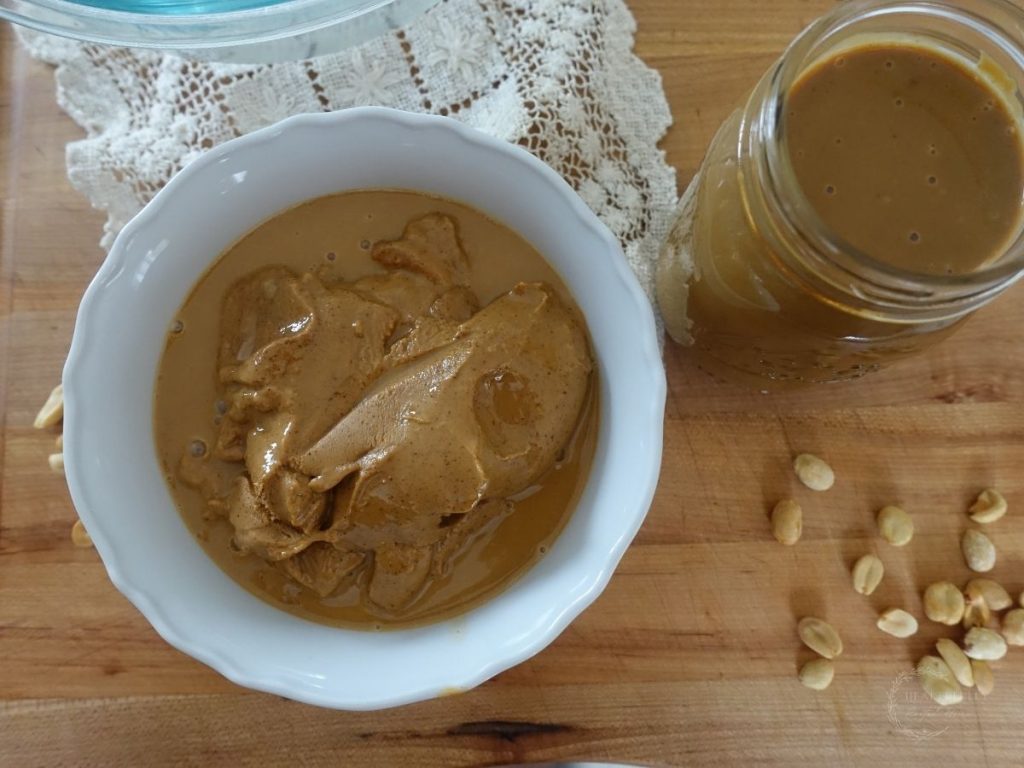
- Peanut butter – I used natural peanut butter with no added sugar for this recipe, but you should note that natural peanut butter will yield a softer fudge, vs. the very firm fudge you’re likely used to. Still delish and way less sugar!
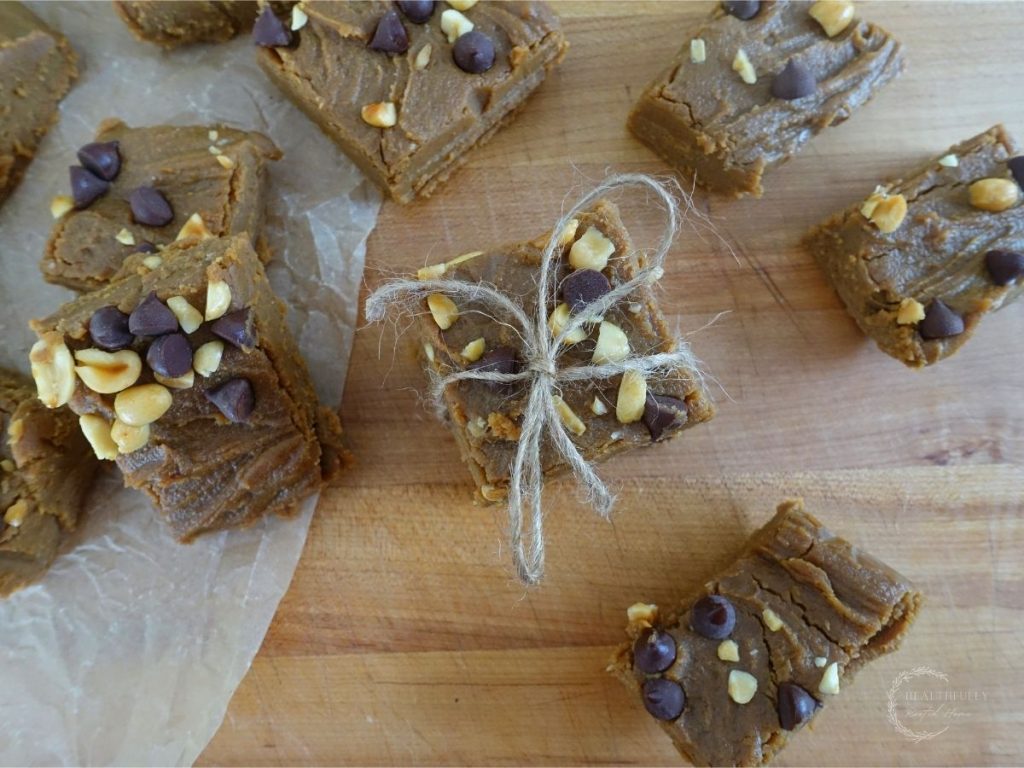
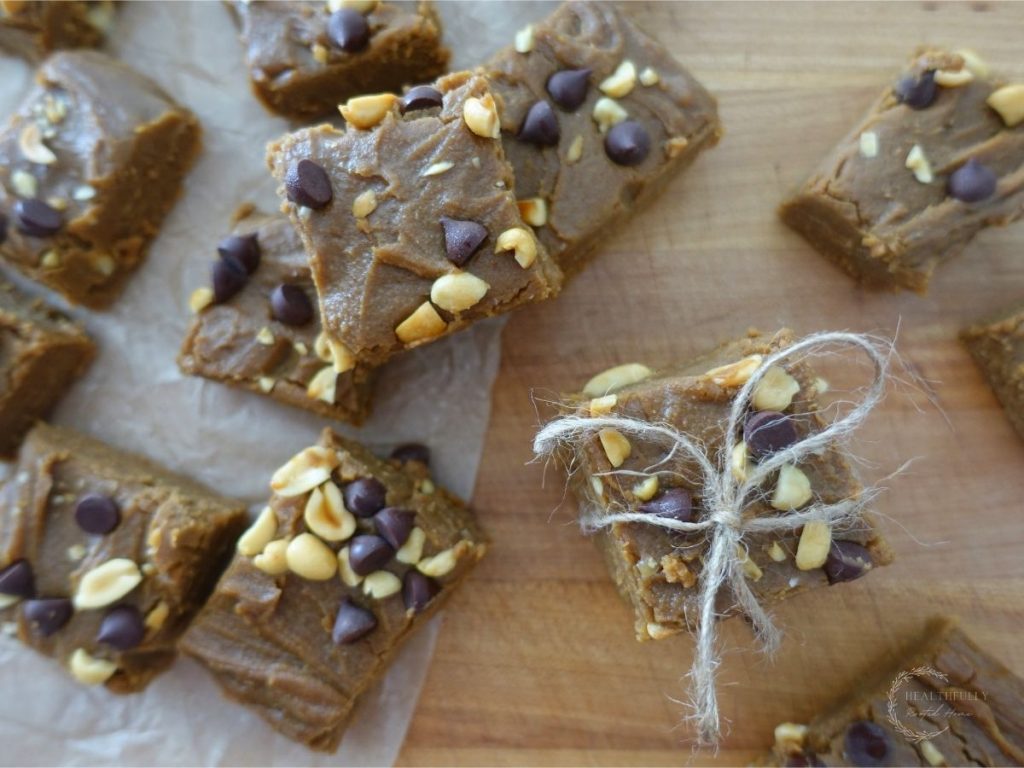
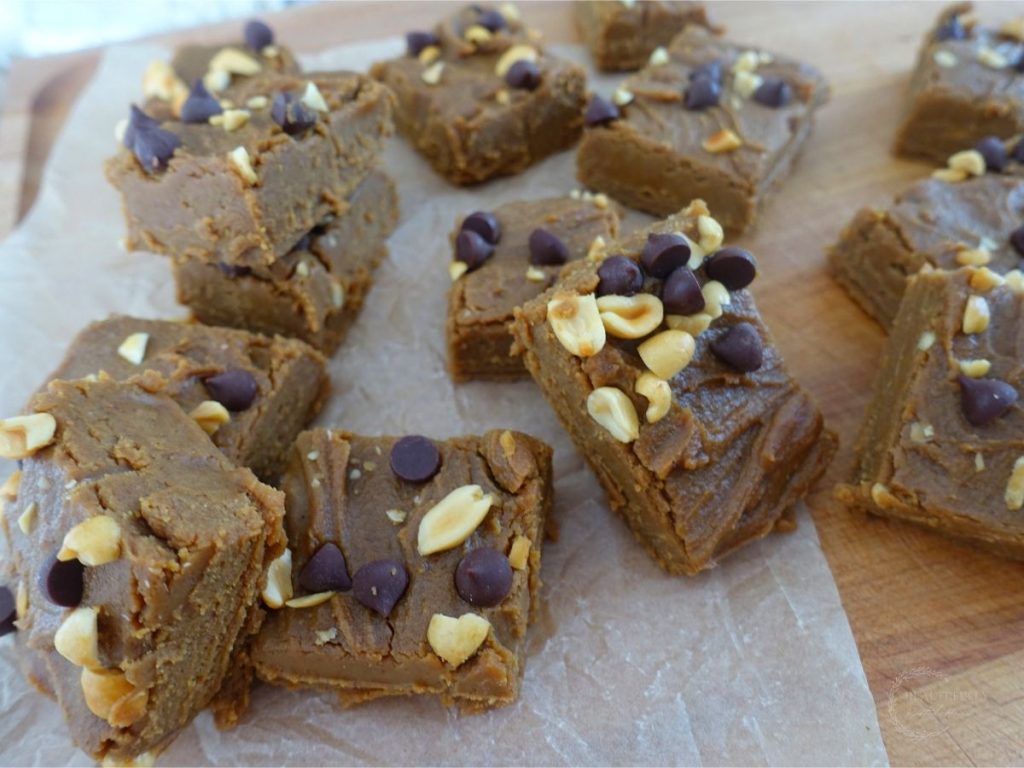
- Optional toppings: chopped nuts, chocolate chips, etc. – this is great for adding a bit of crunch to your fudge and makes it look pretty!
No-Bake Fudge Instructions
Healthier sweetened condensed milk
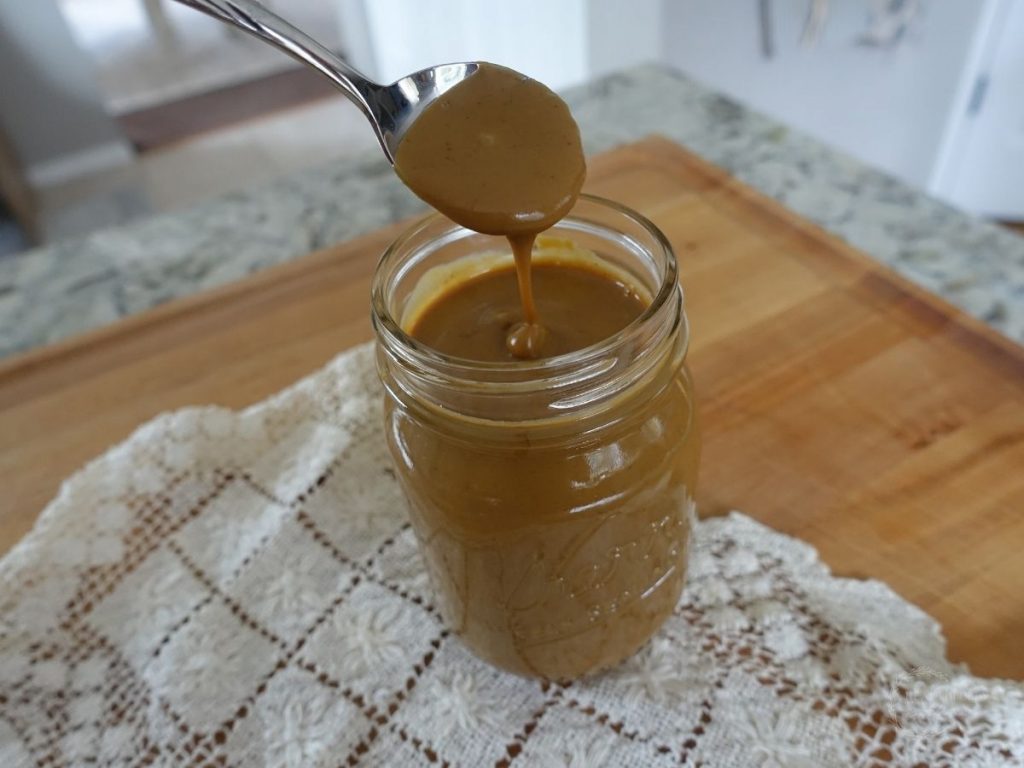
- Combine the milk and coconut sugar in a heavy-bottomed pot stirring with a whisk until the coconut sugar has completely dissolved.
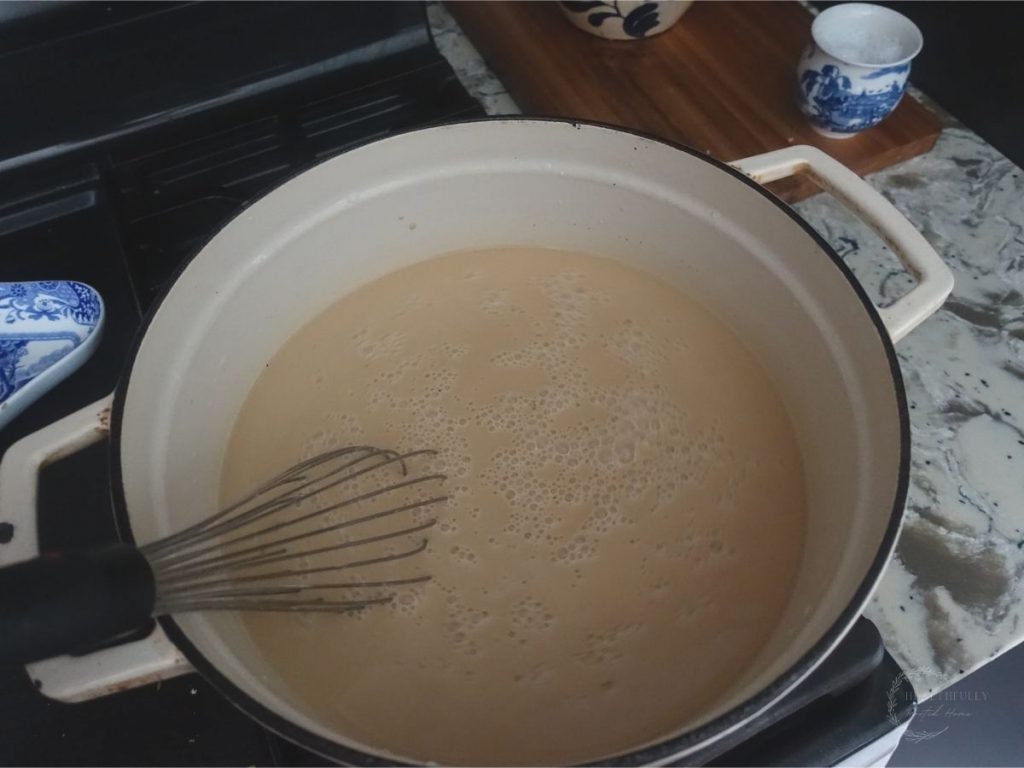
- Bring to a boil over medium heat, stirring occasionally. This wont take long so be sure it doesn’t boil over. Your boil will look more like foam than a rolling boil.
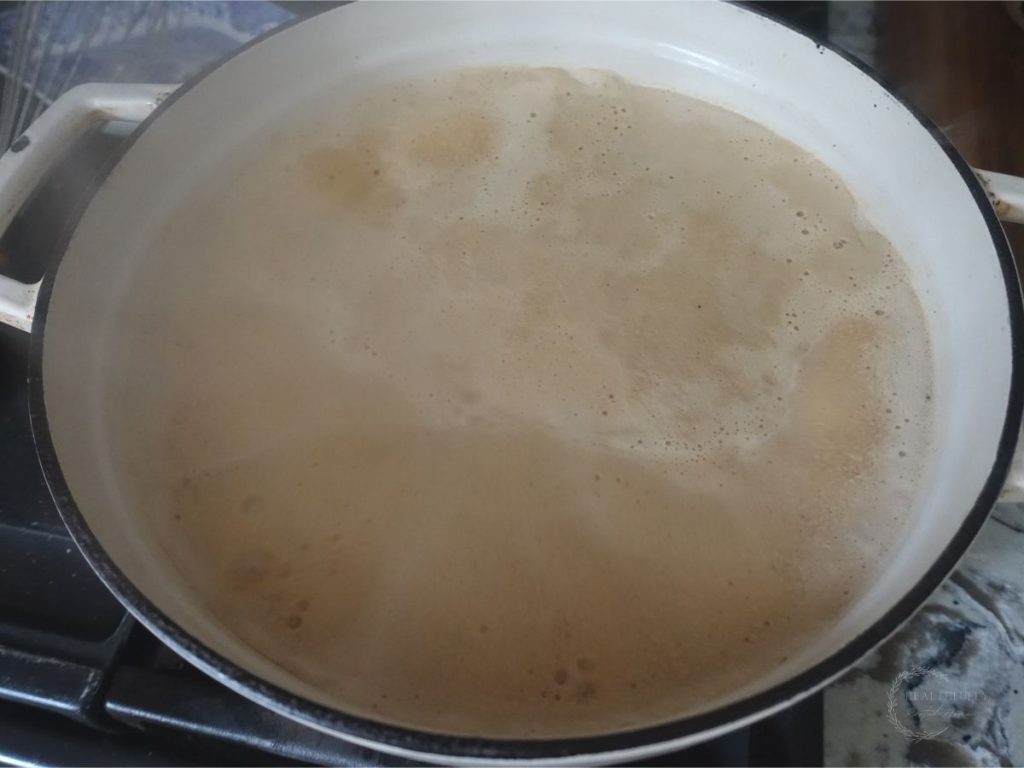
- Reduce your heat to medium-low and keep the milk at a low boil (high simmer).
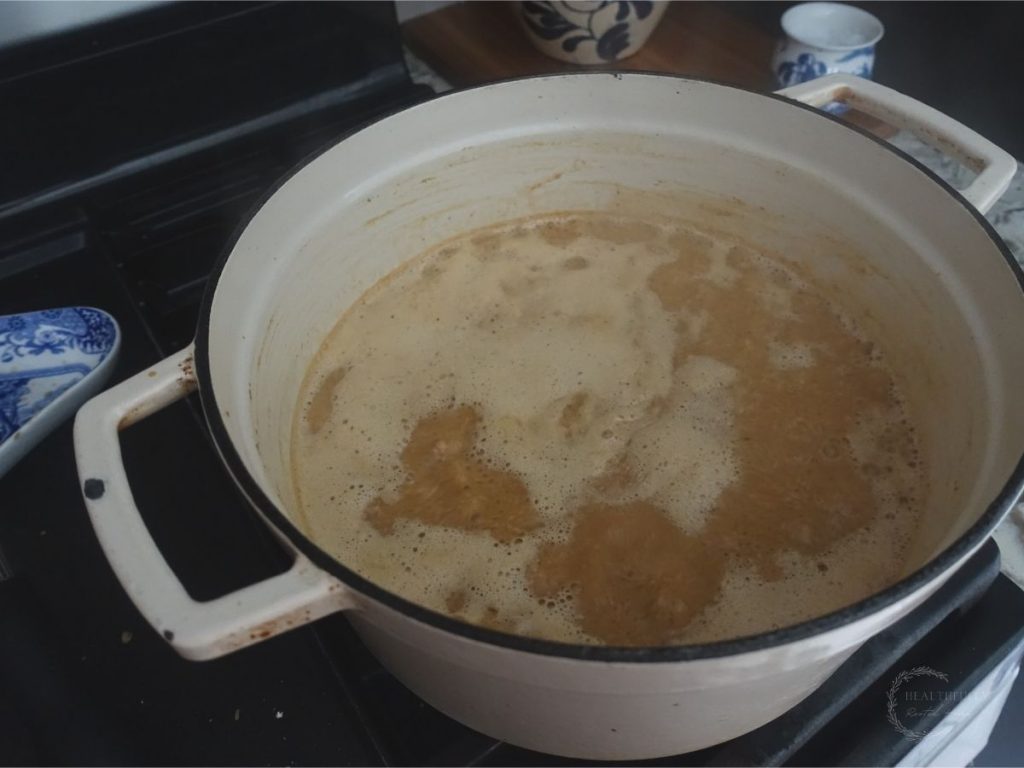
- Let this simmer, stirring occasionally until the mixture has gotten quite thick. Once it thickens, stir more frequently. (see note below on what to do if your milk curdles – DO NOT TOSS).
- You’ll keep the mixture at a low boil until it has reduced by about half. The weight should be about 30oz.
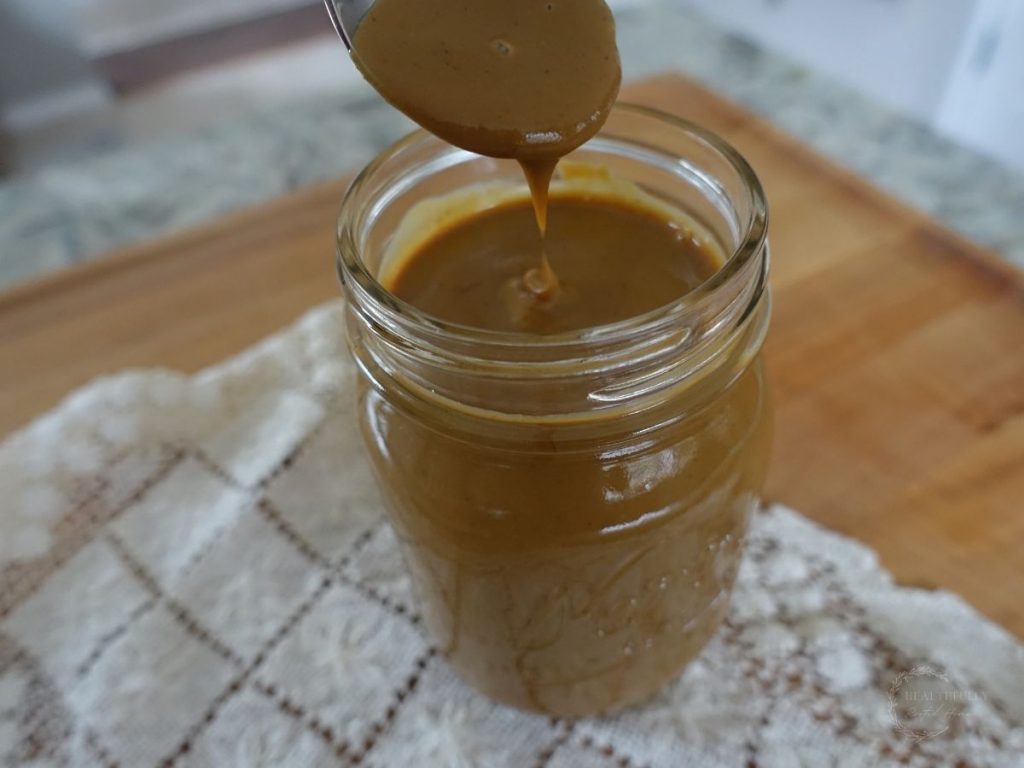
- Transfer the sweetened condensed milk to a glass container and let it cool. It will thicken even more as it cools.
Peanut butter fudge
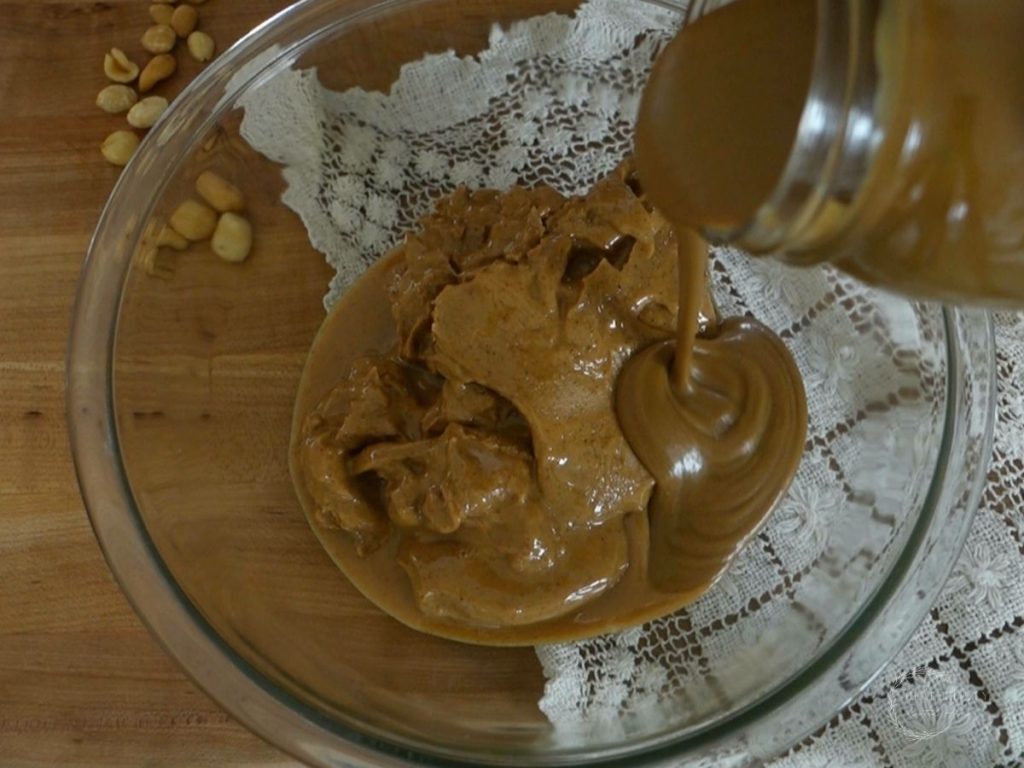
- Once the sweetened condensed milk has cooled (can still be warm, but not hot) combine the peanut butter and condensed milk until thick and creamy.
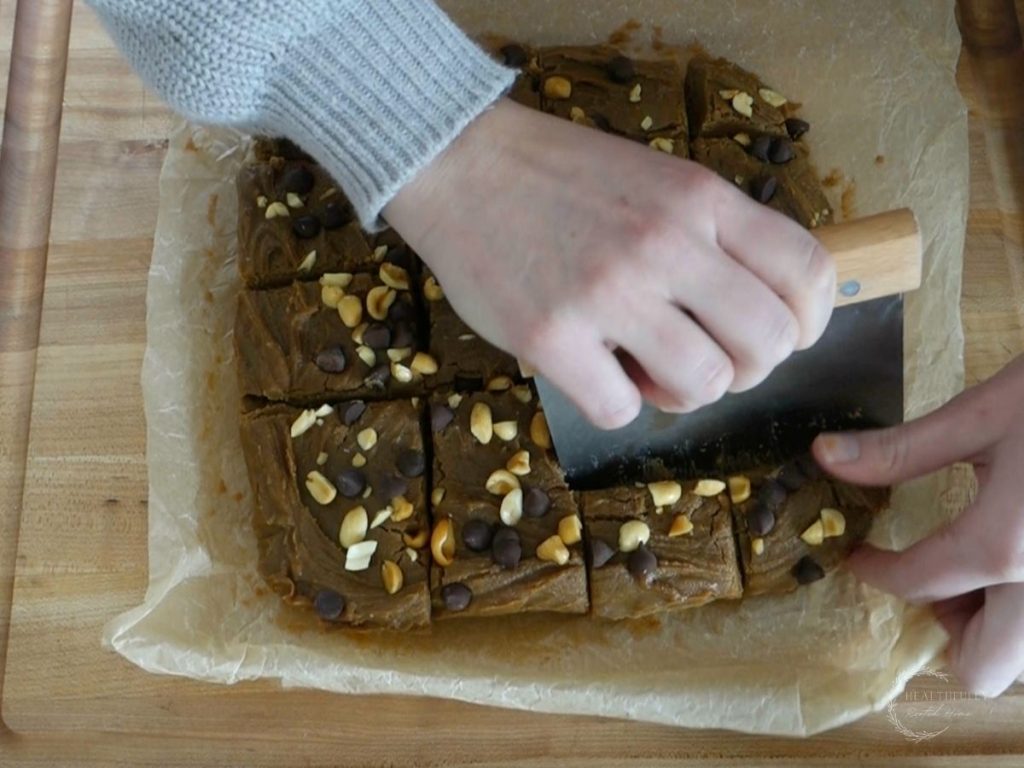
- Top with your optional toppings. I topped mine with chopped peanuts and chocolate chips. Very gently use your hands to press the toppings just slightly into the fudge so they don’t fall off.
- Transfer to a square baking dish and place in the refrigerator to set. You’ll want this to set for at least 4 hours but even longer is better.
- Remove the dish from the fridge, slice your fudge into pieces as big as you’d like, and enjoy!
in a pinch instructions
Use store-bought sweetened condensed milk – same volume, just store-bought. You lose out on the richness of the coconut sugar, and it won’t be as healthy, but it’ll take much less time!
how to store peanut butter fudge
Refrigerator
Store your fudge in the refrigerator in an airtight container for up to 1 week.
freezer
This fudge can even be frozen for up to 2 months. To freeze, wrap your completely cooled and set fudge in parchment paper, then in an airtight container. When ready to enjoy, remove from the freezer and thaw for 2 hours.
Freezing tips
- Completely cool and set the fudge prior to freezing.
- Store in a cooler spot in the freezer (deep freezer is even better).
- If storing fudge in layers, place a piece of parchment paper between the layers.
no bake peanut butter fudge Tips
- Peanut butter – Using a non-natural peanut butter will yield better results in terms of texture if you’re looking for that nice and firm fudge. However, if you don’t want all the added sugar, my recipe priduces a deliciously creamy and rich fudge!
- Sweetened condensed milk – See my note below about curdled sweetened condensed milk. The quick tip here is to not throw it away! It’s totally fixable and still delicious.
- Give it time – The longer you let this fudge set, the better! In fact, I found that it was even better a couple days after making it when it had plenty of refrigerator time.
Using natural peanut butter for fudge
Natural peanut butter will cause your fudge to have a softer texture. This is normal and to be expected when you don’t have all the added hydrogenated oils, preservatives, and sugar in popular peanut butter brands.
If you want a firmer consistency, you can replace the natural peanut butter with regular peanut butter using the same measurements in my recipe.
How to fix curdled sweetened condensed milk
If you curdle your sweetened condensed milk, all is not lost! Use the steps below (in that order) to fix your curdled homemade sweetened condensed milk.
Fixing curdled homemade sweetened condensed milk
- Take off heat and stir
Immediately take the milk off the heat and start vigorously stirring. Sometimes this is enough to make it smooth again if you caught it early and you can stop here.
- Add cold milk
If it’s still curdled add just a little bit (maybe 1/8 cup to 1/4 cup) cold milk and stir vigorously. Stop here if this helps your milk to become smooth again.
- Blend!
Still curdled? Simple take an immersion blender or high-powered blender and blend until smooth! Seriously, it’s that easy.
Serving Suggestions
- Wrap these up in a cellophane bag with a bow and give as a gift. You could also place in a cute cookie tin and separate the fudge layers with parchment paper.
- These are perfect for a holiday cookie exchange!
- Work Christmas parties or family gatherings
- Just for fun on a cozy winter day
shop this post
(These affiliate links help to support this blog at no extra cost to you. Your support means the world to me!)
- Berkey water filter (we use the Royal because we drink an insane amount of water!)
- Thrive Market – 25% off & free gift! (where I get a ton of my ingredients)
- Azure Standard: $25 off your order. Code kyrieluke1
- Dutch oven
- Stand mixer
- Boos Block Butcher Block
- 12 inch Cast Iron Skillet
more Sweet recipes
Healthier Peanut Kisses Cookies
no bake peanut butter fudge faq
If you’re making baked fudge, you probably didn’t cook the fudge long enough. If it’s a no-bake recipe and you’re using natural peanut butter, that could be the culprit.
You could add more powdered sugar if that’s what the recipe calls for. Or change your ratio of sweetened condensed milk and peanut butter slightly. Add more peanut butter and less condensed milk.
Under or overcooking the sugar can cause your peanut butter fudge to be too soft. Also, using natural peanut butter will yield a softer PB fudge.
Pin it for later – no bake peanut butter fudge
Related: Fudgy Crinkle Top Brownies
Related: Christmas Crack with Graham Crackers
print the no bake peanut butter fudge recipe

No Bake Peanut Butter Fudge
Ingredients
Equipment
Method
- Combine the milk and coconut sugar in a heavy-bottomed pot stirring with a whisk until the coconut sugar has completely dissolved.
- Bring to a boil over medium heat, stirring occasionally. This wont take long so be sure it doesn't boil over. Your boil will look more like foam than a rolling boil.
- Reduce your heat to meadium-low and keep the milk at a low boil (high simmer).
- Let this simmer, stirring occasionally until the mixture has gotten quite thick. Once it thickens, stir more frequently. (see note below on what to do if your milk curdles – DO NOT TOSS).
- You'll keep the mixture at a low boil until it has reduced by about half. The weight should be about 30oz.
- Transfer the sweetened condensed milk to a glass container and let cool. It will thicken even more as it cools.
- Once the sweetened condensed milk has cooled (can still be warm, but not hot) combine the peanut butter and condensed milk until thick and creamy.
- Top with your optional toppings. I topped mine with chopped peanuts and chocolate chips. Very gently use your hands to press the toppings just slightly into the fudge so they dont fall off.
- Transfer to a square baking dish and place in the refrigerator to set. You'll want this to set for at least 4 hours but even longer is better.
- Remove the dish from the fridge, slice your fudge into pieces as big as you'd like and enjoy!
Video

Notes
in a pinch instructions
Use store-bought sweetened condensed milk – same volume, just storebought. You lose out of the richness of the coconut sugar, and it won’t be as healthy, but it’ll take much less time!how to store peanut butter fudge
Refrigerator
Store your fudge in the refrigerator in an airtight container for up to 1 week.freezer
This fudge can even be frozen for up to 2 months. To freeze, wrap your completely cooled and set fudge in parchment paper, then in an airtight container. When ready to enjoy, remove from the freezer and thaw for 2 hours.Freezing tips
- Completely cool and set the fudge prior to freezing.
- Store in a cooler spot in the freezer (deep freezer is even better).
- If storing fudge in layers, place a piece of parchment paper between the layers.
no-bake peanut butter fudge Tips
- Peanut butter – Using a non-natural peanut butter will yield better results in terms of texture if you’re looking for that nice and firm fudge. However, if you don’t want all the added sugar, my recipe priduces a deliciously creamy and rich fudge!
- Sweetened condensed milk – See my note below about curdled sweetened condensed milk. The quick tip here is to not throw it away! It’s totally fixable and still delicious.
- Give it time – The longer you let this fudge set, the better! In fact, I found that it was even better a couple days after making it when it had plenty of refrigerator time.
Using natural peanut butter for fudge
Natural peanut butter will cause your fudge to have a softer texture. This is normal and to be expected when you don’t have all the added hydrogenated oils, preservatives, and sugar in popular peanut butter brands. If you want a firmer consistency, you can replace the natural peanut butter with regular peanut butter using the same measurements in my recipe.Fixing curdled homemade sweetened condensed milk
- Take off heat and stir Immediately take the milk off the heat and start vigorously stirring. Sometimes this is enough to make it smooth again if you caught it early and you can stop here.
- Add cold milk If it’s still curdled add just a little bit (maybe 1/8 cup to 1/4 cup) cold milk and stir vigorously. Stop here if this helps your milk to become smooth again.
- Blend! Still curdled? Simple take an immersion blender or high-powered blender and blend until smooth! Seriously, it’s that easy.
About Me


I hope you love this recipe as much as we do! Let me know what you think in the comments!